The modern market offers a large selection of different models of lawn mowers in a fairly wide range of prices. But if you want to save money, but don’t want to mow by hand, then you can independently assemble a grass-cutting machine from scrap parts and available materials based on an unused electric motor from various devices. A DIY lawn mower will cost much less than its factory counterpart. It will allow you to care for lawns, mow grass in the garden and in the country. In addition, you can be content with the creative creative process itself.
Functions of the blade in a lawn mower
The lawn mower blade performs the function of mowing the grass. The knives are made of high quality steel. Sharpening a knife affects the performance of the job. A sharp tool cuts plants evenly. Blunt - leaves a fringe on them, that is, the cut of each blade of grass turns out to be cut perpendicular to the surface into several parts. This happens when you pick grass with your hands. As a result, grass that is cut neatly and evenly will have a longer cut the very next day. This lawn looks attractive and bright. In the second case, the area in front of the house turns out to be a dirty green color. Dissected sections heal only after 10-18 days.
Knife from lawnmower
Note! An additional function of the blade in the lawn mower is to create an air flow during rotation, thanks to which the plants are transferred to the grass catcher. For this purpose, blades often have several special serrations.
Blade Shaping
Before heat treating the blade, you need to finish it. This is necessary to obtain a quality product in the end. To finish the blade you will need:
- sandpaper from 60 to 220 mm (you can use a grinding wheel and a drill);
- sanding block (even when using a grinding wheel);
- files.
This is the easiest step. You need to start sanding the blade with the finest sandpaper and go up to 220. The main thing is not to skimp, because later you will regret the scratches that were not removed in time.
Always make each subsequent sanding perpendicular to the direction in which you were previously working.
Reasons for removing the knife
Engine for lawn mower
Common reasons for removing or replacing a cutting element include:
- The knife became dull;
- The element is bent and deformed;
- The knife shows chips and cracks;
- The blade has become sharpened and thinned.
When the blade becomes dull, bent or deformed, the lawn looks unkempt after mowing. Proper sharpening will correct the situation.
Professionals advise carrying out the procedure once a year. It is better to do this in the spring, before starting work. If the cutting elements become dull faster, then they are sharpened more often.
Knife sharpening
If chips or cracks are visible on the blades, or if it has become very sharp and thin, then replacement is necessary. There is no point in sharpening such a tool. In addition, the blade can break at any time and fly out from under the machine body, injuring people or animals nearby. Such a device may also cause engine damage. It is allowed to replace the item with a similar model. The characteristics of the knife are indicated in the instructions.
If the store does not have a suitable product, you can always purchase shorter blades. In this case, it will take a little longer to tidy up the lawn than before. But this is not a problem compared to the fact that sometimes an unsuitable knife cannot be securely attached to garden equipment. Then the way out is universal lawn mower blades. These are blades, complete with adapters, bolts, washers, etc. The knives themselves have several mounting options. As a result, the cutting elements can be fixed on completely different models.
Popular mulching attachments
The mulching function is becoming increasingly common not only in models in the mid-price segment, but also in budget versions. Thanks to it, the structure will retain the volume of cut material, after which it will throw fine grass to the surface, while the distribution is carried out evenly. In most such equipment, all the necessary materials are installed in the housing. This is how the grass comes in and begins to be crushed.
We must not forget that when mulching the engine faces additional load. Therefore, it is not recommended to constantly chop, as this will negatively affect the performance of the lawn mower.
Weather conditions are also taken into account, for example, if a person decides to carry out the process at high humidity levels, the device will require more energy. It is best to mulch during dry times.
There is nothing complicated in choosing a nozzle; the main thing is to use it correctly. In addition, it is an easily replaceable element, which is an additional advantage.
Makita 664140223
A durable device designed to stop the ejection of grass. Thanks to the action of this device, all the shavings are evenly distributed over the lawn, which helps fertilize the soil. The product is not universal and is only suitable for lawn mowers of the corresponding brand. The dimensions of the structure are standard, the mounting is simple. The product is wear-resistant, which allows it to be used for a long period.
The average cost is 1,300 rubles.
mulching attachment Makita 66414022
Advantages:
- Strength;
- Convenient shape;
- Value for money;
- Long service life.
Flaws:
Mulch-Kit-448 (46 cm)
A good kit designed for lawn mowers such as Viking MB-448, 460, etc. devices where the cutting width is 46 cm. The set contains all the necessary elements, including a multifunctional knife, as well as a special attachment.
The last part is made of durable material. Thanks to the action of the cutting parts, the grass is evenly distributed over the surface of the lawn. In addition, chopped grass helps protect the soil from drying out.
The average cost of a set is 4,200 rubles.
mulching attachment Mulcha-Kit-448 (46 cm)
Advantages:
- Affordable price;
- High quality set;
- The nozzle is made of durable material;
- Simple mounting.
Flaws:
V-DECK MTD OEM-731-2386
The product is capable of working with MTD devices where the grass cutting width does not exceed 48 cm. Like the previous version, the nozzle is sold complete with knives and fasteners. This facilitates the rapid and efficient conversion of grass into green biomass.
Products are manufactured in the USA. Fastening is carried out in a standard way; even a beginner can easily cope with this process. The nozzle body is made of wear-resistant plastic.
Average cost: from 1,000 rubles.
mulching attachment V-DECK MTD OEM-731-2386
Advantages:
- Low cost;
- Efficiency;
- The set contains good knives;
- High service life;
- Durable housing;
- Convenient fastening.
Flaws:
ROTAK 34/37/34LI/37LI Bosch
A high-quality attachment from a popular brand that is suitable for ROTAK brand lawn mowers. Convenient location prevents the release of unchopped herbs. The kit contains only fastening elements.
The outer part is made of durable plastic that does not crack from frequent use. At the end of mulching, the grass lies in a neat and even layer on the surface of the ground, which helps fertilize it and also moisturizes the soil.
mulching attachment ROTAK 34/37/34LI/37LI Bosch
Advantages:
- Promotes uniform distribution;
- Value for money;
- Durable housing;
- Reliability.
Flaws:
Multimulch Bosch F016800499
Another popular product for devices like Gen5 is AdvancedRotak. As with the previous version, the outer part is made of durable material that is highly durable.
Thanks to the strong air flow, the cut grass does not leave the lawn mower and is compacted under the grass roots. To increase the efficiency of the device, it is recommended that when cutting tall grass (70 mm), set the cutting height to 2 cm.
mulching attachment Multimulch Bosch F016800499
Advantages:
- Strength;
- Does not deteriorate over time;
- Convenience;
- Popular product.
Flaws:
Removing the knife
Preparation
Stung by a bee - how to remove the tumor
The independent process of partially disassembling the vegetation cutting unit begins with preparatory work. You should follow safety precautions and wear gloves. It is necessary to prepare a key in order to unscrew the fastening, as well as a small plate that will help fix the knife. The electrical appliance is disconnected from the network. The gasoline engine is drained of fuel and the spark plug is turned off to eliminate the possibility of sudden contact. Regardless of the type of machine, the owner must unscrew the grass catcher.
Important! Before turning the mower on its side or upside down, you should inspect it to make sure there is no gas or oil leaking. It is best to drain the oil in the crankcase too. Otherwise, if a leak occurs, starting the unit will be problematic.
You can also not turn the mower over, but simply place it on a frame or two chairs that simulate a lift. After this, the person approaches the device from below.
Preparing to remove the knife
The mower can be equipped with:
- Single two-bladed knife of different shapes;
- Two knives;
- Blades with four blades;
- Composite cutting structure.
In the first case, one knife is used in the shape of a small strip. Its length will be similar to that indicated in the characteristics of the device under the item mowing width. Usually it is 30-50 cm.
In the second case, two knives are used, which are attached at an angle of 180 degrees relative to each other.
On a note! Another option for the cutting system is blades with four blades. They can be connected to each other by a common base or not.
In the latter case, we are talking about several knives located at different heights. Modern models that have the additional function of mulching the lawn are equipped with such an attachment in the form of an upper blade. The upper blades receive plants from the grass tank. Sharp edges carefully crush the greenery, which after the procedure covers the soil of the lawn and turns into mulch.
How to remove a blade from a lawn mower
Step by step process
- Before removing the blade from the lawn mower, secure it with a strong board or log resting on the ground. It is necessary that the knife does not move when it is removed. However, some people neglect this safety measure and simply hold the cutting plate with their hand.
- Take an L-shaped socket wrench or socket tool that fits perfectly in size. It is not recommended to use pliers. This metalworking tool easily damages the edges of bolts.
- Typically, the cutting unit is secured with one large bolt located in the middle. Modern models have several fasteners. As a result, you will have to unscrew them all.
- Bolts most often have right-hand threads. Therefore, to unscrew the bolt, the key is turned counterclockwise. In order to screw it back, do the opposite, that is, tighten the bolt clockwise.
- It happens that over time, a threaded pair becomes stuck, rusts, and unscrewing the bolt becomes problematic. In this case, special lubricants called liquid keys are used.
- If the removal was successful and all fasteners are intact, then the bolts, nuts, and washers are put into the box for safekeeping. It is possible that these connections will have to be reused.
Additional Information. Before removing the knife, you need to remember its position. Most often, knives are placed with their tip counterclockwise, and the rotation of the element occurs in this way. However, the advice does not apply to all models. Therefore, you should pay attention to the position of the element. It is in the same position that you will have to place a new knife or screw the old one after sharpening.
General information
If you compare factory models of lawn mowers with those made by yourself, then, of course, the former win in all respects. They have increased functionality, which includes switching speeds, adjusting the position of the knives, and less noise is also good news. And most importantly - a quality certificate and a warranty card, with which you can contact the service center if a problem occurs.
A mechanical lawn mower made with your own hands can be improved if desired and necessary. You can attach a handle with length adjustment, a safety bumper, a container for collecting mowed grass, and an installation for changing the height of the knives to the unit.
Some “crazy hands” manage to combine the unit with a bicycle. In this matter, the main thing is imagination and properly growing hands, then everything will work out.
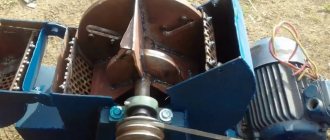
Lawn mower equipment
To make an electric lawn mower, you can take a motor from any device that you no longer use for various reasons. The engines of small devices that you use at home cannot withstand heavy loads, but they will when mowing grass. They quickly overheat and fail, and there is no point in repairing them. It may seem that the motors from vacuum cleaners are capable of coping with such work, but in reality this is not the case, they are also rather weak for this. To ensure uninterrupted long-term operation of the lawn mower, you will need a 1 kW/h motor.
A knife for a grass mowing unit must be sharpened from strong and thick steel. Can be made as a single element or as several fixed in the center. Also, a hand-sharpened disc is suitable for the job. This is the safest and most durable option.
The handle for the lawn mower can be taken from an old stroller or wheelbarrow.
Also, to simplify the task, you can take a frame from a stroller or cart; it is important that the parts are intact without traces of corrosion. If you don’t have something similar at hand, the frame can be made from metal pipes
In addition, in order to make the unit you will need a power cord, preferably a long one. The wheels should be small in diameter, with a height to the middle of at least 10 cm, so that you can move around the site without hindrance.
For knives, a protective cover is required, which is fixed around the cutters. It can be made from a metal sheet or selected ready-made to size. Installing a cover is mandatory in order to comply with safety precautions for the person operating the lawn mower, as well as to protect the cutters themselves from stones.
Cleaning the knife before sharpening
Bee sting - how to relieve swelling
Before sharpening the knife, it is thoroughly cleaned. Plant sap and small grass particles accumulate on the steel strips. In this case, the juice hardens over time and turns into a hard crust. There is no need to wash the blades; it is best to pick up a sharp metal scraper in the garage or use a brush.
You should not polish the cutting element of the machine until it shines; the main thing is to remove adhering waste. After this, you need to improve the knife by straightening it and removing all the irregularities. The bumps occur due to hard debris and stones getting on the blades. The correct option in this case is to work with a hammer. With the help of this tool and a flat working surface on which the knife is placed, all local curvatures can be corrected.
Cleaning the knife before sharpening
Experts advise starting to level the blade from the edge, gradually moving towards the middle part. As a result, the steel strip should become as smooth as possible. Only in this case will it be able to perform its function, creating an air flow that carries the grass into the tank for collecting plant residues.
Description of devices
It’s worth starting with the fact that the word mower speaks for itself.
Rotary mowers at MTZ are a device that allows you to mow the vegetation of fields and meadows, be it weeds or crops that need to be disposed of.
Often in everyday life you can hear a synonymous definition of a rotary mower as a disk mower, which only allows us to state: the functioning of the current equipment occurs due to disks, which perform the main function of mowing.
Typically, the rotary type of device can be seen coupled to a vehicle, usually a tractor. Mower
attached to the vehicle using trailed, mounted or semi-mounted equipment.
The distribution of rotary mowers is similar according to the location of the cutting device, which can be attached to the front, rear or side.
The mower into working condition due to the movement of the wheels.
If you visually imagine the structure of a rotary mower, it will look like this: a support wheel with cutting parts is fixed on a metal frame. By driving the support wheel, the cutting system automatically works, which, in principle, is mowing. One of the brightest representatives of these units is the Polish rotary mower
1.85, information about which you can find here.
Based on the models and variations of this equipment, the mower
can have 2-3 knives attached to the support wheel using a triangle (at the back, as well as at the front and side). This will significantly increase labor productivity.
At the same time, the standard ones also have very high output indicators.
Sharpening
Sharpening of cutting elements is organized as needed. Many people ask the question: “Does a new knife need sharpening?” The answer is no. These elements are sharpened at the factory. After purchasing garden equipment, you can use it without additional work to remove and sharpen the blades.
There are two ways to sharpen the cutting element of a lawn mower:
- File;
- By machine.
File
In the first case, the work is organized if the blades are in relatively good condition and only slightly dull. Typically, such sharpening is used if the owner sharpens the cutting elements of his garden tools several times a season. If this is the case, then it will be quite enough to go through the edges with a file and correct them.
During operation, the curves of the knife and roughness are removed. At the same time, it is important to maintain the factory sharpening angles and descent. Both sides (blades) are ground evenly. The sharpener is kept in the same position. An imbalance must not be allowed to prevent the smooth operation of the blades. This problem will lead to rapid wear of the assemblies (bearings).
Sharpening with a file
After the main sharpening, it is necessary to edit the edges. This is done in order to remove the smallest debris. It is best to use 800 grit sandpaper. Editing consists of slightly moving the paper along the plane of the slopes.
Note! Instead of a file, you can use a sanding block. Before the procedure, it is soaked in water and soap for a quarter of an hour. During operation, it is also allowed to slightly moisten the instrument.
Machine
The machine will help you get the job done quickly and without much effort. The main thing in this matter is not to get too sharp edges. If you sharpen them as thin as a razor, there is a high risk of chipping and breaking.
Sharpening on a machine
During operation, it is important to maintain the correct angle and remove metal from the blades in the same amount. The machine does not eliminate the need to straighten edges with sandpaper.
Correcting a cutting edge after damage
If part of the cutting edge was damaged after being hit by a stone or some metal part, but the knife itself was recently sharpened, then the most common musat will help correct the situation. It is advisable to use high-quality variations made of ceramics, rather than steel or aluminum coated with an abrasive material. Even the musat used to sharpen kitchen knives is suitable. The only caveat is that the walls of the tool will wear out quite quickly. That is, it is better to use a separate device for straightening the edges of lawn mower blades.
You should not hope that you will be able to achieve perfect sharpening of the blade the first time. The most common problem that beginners have is maintaining the correct angle of 30°. For these purposes, a machine with stones (with large grains) from Lansky will be useful. This is a manual machine that allows you to set a certain angle when moving the whetstone and maintain it throughout the entire process of leveling/sharpening the edge. Such a set is relatively inexpensive, and a set of stones is enough for at least 20-30 sharpenings.
Dull lawn mower blades can be easily sharpened with an abrasive stone or file, but severely damaged blades should be sharpened on the stand of a sander. The store's service department can do this for you or tell you when it's time to change your lawnmower blade.
A mower blade that has become nicked, dented, or burred from hitting rocks and branches is no good for your lawn. A dull blade tears up the grass instead of cutting it clean, making it more susceptible to disease. To sharpen a blade that is in fairly good condition, simply clamp it in a vise every couple of weeks and run the whetstone along the cutting edge, making sure your bevel angle matches the factory bevel angle. (Always disconnect the spark plug wires before removing the mower blade or doing any maintenance on the mower.)
If the blade of your lawnmower blade is seriously damaged, it will need to be sharpened on a sander stand or may need to be replaced. The store's service can sharpen it for you or suggest a new knife. But if you have your own grinder, it's easy to sharpen yourself.
Start by running the lawn mower blade back and forth, cutting edge straight, perpendicular to the abrasive wheel to remove any dents or nicks. This will give you a blunt but straight edge. Then, using backing plates, while holding the blade at the angle of the existing bevel, begin bevelling the blade until you have sharp edges.
Finally, check to make sure the blade is balanced: cutting a lawn mower with an unbalanced blade can damage it. This can be done at a workshop or lawn care service. But you can do the balancing yourself: place the blade on the balancer and see if one side goes down, then you need to remove a little steel from that end (but not from the cutting edge!) to make it lighter. Once the blade is balanced, screw the lawnmower blade back on and you'll be ready to tackle long grass.
Sharpening blades for lawn mowers will be needed in any case, regardless of what kind of lawn mower you use in your country house or on the site of your country house. There are several types of lawn mowers: manual trimmer, walk-behind mower, and self-propelled lawn mower.
Every type of lawn mower has blades that are driven in a variety of ways. A mechanical lawn mower begins to work by pushing it around the area, an electric lawn mower is equipped with a motor that runs from the electrical network, and the engine of a gasoline lawn mower requires refueling with gasoline. Each type of lawn mower has pros and cons, and choosing a lawn mower depends on the size of your yard, the type of grass, and the size of your lawn.
Whichever of the listed units you use, sharpening lawn mower blades is a procedure that will have to be addressed regularly. Well-sharpened lawn mower blades will ensure uniform mowing, cutting rather than tearing out the grass by the roots, and easy and quick work on caring for the area. A worn, dull knife with jagged edges from stones and sticks puts unnecessary strain on the engine, which can affect its longevity. Timely sharpening of lawn mower blades will extend the life of the entire unit.
Knife installation rules
After the knife has been sharpened, it should be put back. Installing cutting elements is not very difficult. The main thing is to follow the rules:
- Determine what position the knife was in before.
- In the same position, secure it with a new or old bolt, washer and nut.
- Do not overtighten the nuts. This will cause deformation of the cutting tool.
- You should wear thick gloves while working. It is important to remember that refurbished blades are sharp.
- Once the mower is on the ground in its normal position, it is not recommended to turn it on immediately. It is necessary to wait an hour for the oil to drain from the crankcase walls.
Even a novice gardener can figure out the intricacies of removing the cutting element from a lawn mower. However, when sharpening yourself, you should be extremely careful so as not to get hurt and not to remove too much metal, thinning the knife.
0 0 votes
Article rating
Required tools and materials
To make a lawn mower from an angle grinder or a washing machine at home, you will need to stock up on the following tools, accessories and additional materials:
- electric drill;
- a grinder with metal discs or a jigsaw with files for different materials;
- hammer;
- tape measure or ruler;
- pencil or marker;
- vice;
- pliers;
- screwdriver;
- an abrasive stone or an emery machine;
- a welding machine and electrodes for it (if you make welded metal joints, not bolted ones);
- wires;
- on/off button (taken from an angle grinder or washing machine);
- bolts with nuts and washers (preferably lockers);
- metal corners or wooden blocks.
Instead of a grinder or jigsaw, you can use a hand hacksaw or a wood saw with fine teeth. It is also recommended that you first make a drawing of a homemade mechanism in order to have an idea of the final result, based on the parts available.
Engine
As was said a little earlier, a do-it-yourself lawn mower can be made with different types of engines. First of all, these are, of course, electric motors.
A gasoline lawn mower, on the other hand, requires some knowledge about internal combustion engines, since you don't need a very powerful motor. In fact, it is best to use the engine removed from the lawn mower. As for mechanisms with a different original purpose, it will be difficult to judge their safety in operation.
A self-made lawn mower does not require very high speeds or power. If we talk about the electric motor, then 500-600 watts along with three thousand revolutions are enough for you. Although the latter must be mentioned separately.
High-quality care of your lawn mower is the key to its long-term use.
It is worth noting that a lawn mower is a universal and one of the most convenient machines that is used for gardening purposes. By using a lawn mower, you can create an unusual landscape design on your site.
A lawn mower can be called a highly specialized unit, since it can only cut the lawn. Nevertheless, it is the lawn mower that becomes the best assistant for summer residents and owners of suburban areas. Lawn mowers are required for municipal services.
With their help, parks and squares are always maintained in proper condition.
When buying a lawn mower, special interest and attention is always shown to it. Remember not to overload the lawnmower. The machine needs maintenance and cleaning by hand. However, over time, the lawn mower still becomes a common tool for work, which receives little attention.
Gasoline or electric lawnmowers, the choice is yours
Today you can find two types of lawn mowers on sale. These are electric lawn mowers and gasoline ones. If you need to mow the grass far from home, it is best to use gasoline equipment. The advantage is that a gasoline lawn mower does not rely on electricity. The engine is absolutely not affected by long-term operation of the lawn mower.
The speed of cutting grass with a gasoline lawn mower is much higher than that of an electric lawn mower. Before starting a gasoline lawn mower, you need to make sure that there is fuel in the tank, and most importantly, engine oil. If there is no oil, the engine will seize. In this case, you will have to spend a lot of money on repairs.
Electric lawn mowers are considered more economical and quieter. However, there is a clear drawback to electric lawn mowers - their lack of mobility. And it is limited by the length of the power cord. You need to be close to an outlet at all times. Moreover, during operation the wire often gets tangled and has to be corrected.
Before turning on the electric lawn mower, you need to check whether the power cord and the outlet itself into which it is plugged are intact. Under no circumstances should an electric lawnmower be used during rain or dew. This technique can only be used on dry grass.
choosing a lawn mower for the dacha
Operating instructions for gasoline and electric lawn mowers
The operating rules for gasoline and electric lawn mowers are approximately the same. You should always follow the rules that are clearly stated in the instructions from the manufacturer. It is important to pay attention to the moment when you need to take a break from the device. For example, if the engine of a gasoline lawn mower overheats, this will lead to its failure.
Video: Which Side to Place the Disk on the Trimmer
The procedure for installing the disc on the trimmer
Installing the trimmer blade is very easy. To do this, use a full wrench to release the cutting equipment and the locking pin.. Procedure yes.
- First of all, you should disconnect the electric trimmer from the network, gasoline. just a muffler. Remove and remove the protective cover on one side
- The holes in the gearbox and shaft must then be connected to insert the pin and lock the drive.
- If a hair spool was used, it should be turned clockwise.
- Then you need to find a nut to tighten the knife.
- The next step is to install the knives. Trimmers often wonder which side to put the disc on. This should be done so that the numbers and letters are at the top.
- Then you need to put the cover on top and above it. a fastening nut that must be tightened tightly with a wrench.
- Last step. install the protective cover.
As you can see, the procedure is very simple and the same for many brands, be it Husqvarna or Husqvarna.
The note! If the device owner wants to replace the drive back with a cable, you can install the coil in the same way.
Disk selection criteria
You need to choose a plastic or metal blade, taking into account the area being treated and the type of trimmer. electric or gasoline. The number of blades will depend on how much growth is being removed with the tool. You can select the desired disk shape, number of blades and material of manufacture using the device’s operating instructions. It usually determines which cutters are recommended to be used to solve certain problems.
material
It is not recommended to attach metal blades to electric scythes, as their design features make them dangerous for the user. This is due to the curved shape of the shaft, the lack of locks on the handles and the high rotation speed.
Important! The straight arrow ensures safe use of the trimmer when the disc is rotating against an obstacle. In this situation it bounces back towards the person, so the bent design can cause injury
On flexible bar trimmers, plastic blades should be used for safety reasons. Their purpose is to mow soft grass and dead wood. While metal discs are great for tall, dense, tough shoots, shrubs and tree shoots.
blades
The number of blades is important when solving various problems. So two or three pieces are enough to grind the herb
To mow, the disc must have four to eight blades. To destroy small shoots of trees and shrubs, instead of discs there must be a large number of small teeth.
Disc sharpening
Regardless of the quality of the disc, over time it becomes dull and begins to cut poorly. If the blades are still relatively new and not practical, you can sharpen them yourself.
Important! Sharpening is only suitable for discs that do not have a hard solder joint. Such parts are discarded and replaced with new ones.
To sharpen discs you need:
- disassemble the trimmer, remove the blades;
- carefully inspect the disc. if cracks are found, it is better to replace the part with a new one, since further work is dangerous;
- curved blades can be carefully bent with a hammer;
- Considering the size of the disk, you need to choose the right file for the metal, this will ensure more convenient work;
- sharpen all the upper cutting edges of the discs equally at an angle of 30°;
- Reassemble the trimmer in reverse order.
You can use a low-speed grinder to sharpen the disc using a medium-grit sanding wheel. With this tool the process will move much faster. For your safety, you must wear gloves and a face mask or safety glasses.
Thus, to mow grass on gasoline and electric trimmers, plastic and metal discs of various shapes and with different sets of blades are used. They are selected depending on the type of work being performed and the size of the area being processed. If your mower blades are dull, you can easily sharpen them or replace them yourself.
Although the procedure is simple, care must be taken and precautions must be taken to avoid injury due to negligence or equipment damage. A more detailed description of replacing the blade for a specific trimmer model can be found in the operating instructions or on the manufacturer’s official website
For clarity, the general process diagram is shown in the video.
Select which line
The thickness of the polyethylene thread depends on the technology model and varies from 1.2 to 4 mm. She may be:
- with a round cross-section - this is the most durable material for mowing herbaceous plants;
- with a figured section - used for mowing soft plants;
- twisted - used for thin grass;
- professional, not suitable for all technology models.
To change the line on your lawn mower, you need to purchase a cutting thread
, which is ideal for a particular type of mower.
Selection criterion
You can soak the thread in a bowl of water for a few minutes to increase elasticity and strength.
Model selection
First you need to draw the future fillet knife and trace the resulting shape on graph paper. Try to draw the knife to scale, that is, in real size. The fewer changes you need to make to the design, the better.
READ Do-it-yourself angle grinder speed adjustment
Now you need to decide how the handle will be attached to the knife blade. There are three common methods that will help you make a full, partial, or through knife.
The handle consists of two identical parts - these will be, for example, wooden parts. A partial method is when the knife blade continues into a shaft, which is then hidden by the handle. The handle parts are placed on the rod and secured. By the way, Japanese swords and sushi knives are made using this method.
A through knife is similar to a partial knife, but an extension of its blade extends through the entire handle so that the handle can be secured with a nut or thread at the other end. Most knives with stacked handles are made this way.
Choose the model that you like best and get to work.
Balance check
Before you put the blade back, you need to make sure that its arms have at least approximately the same weight. Otherwise, vibration will occur during operation, which will not have a positive effect on the durability of the spindle.
Balancing is carried out mainly for double-sided single and compound knives; four-blade knives are not so susceptible to imbalance. To check the knife, you need to clamp a smooth rod in a vice in a horizontal position. The blade is put on it through a hole in the center, after which attempts are made to install it strictly horizontally. If one of the arms weighs significantly more than the other, the knife will inevitably turn to one side.
Equating the weight of the arms is done by grinding a small amount of metal off the back of one of the arms of the knife. It is not necessary to achieve ultra-precise balancing, but the knife should remain in a strictly horizontal position for at least a few seconds. Once the balancing is done, you can put the blade back in place and finally refresh the look of your lawn.
Sources:
https://pikabu.ru/story/kak_samomu_zatochit_nozh_gazonokosilki_7121347 https://stroy-podskazka.ru/gazonokosilki/zatochit-nozh/ https://rmnt.mirtesen.ru/blog/43389268724/Pravilnaya-zatochka-nozha-gazonokosilki-svoimi -rukami
Electric mower made from a drill
The frame is made in a curved shape. An example would be a homemade device made from a drill, where a wide knife is attached instead of a drill. The drill is attached to the handle of the frame.
The advantages of such a device include:
- lack of connection of the power cord, since a drill mechanism is used;
- Possibility of cutting grass at curbs and under trees.
It is not difficult to come up with an attachment to the drill frame, but in terms of operating time and reliability, a homemade lawn mower based on it will be many times inferior to asynchronous motors, which are more often used for these purposes. Therefore, for the care of large areas, preference is given to the latter.
A drill is more suitable if you need to assemble a homemade trimmer.
Wheels
This is a very important point on which the future operation of the lawn mower depends. So you need to select everything here very carefully, sparing no time.
The optimal height of the wheels should raise the knives above the ground by five to six centimeters. This way you can create a lawn that is pleasing to the eye. If you take the height lower or higher, the result will be far from the same. Either some areas will be skipped, or the entire structure will be covered with a copper basin.
You choose the number of wheels yourself. You can make a structure on four, three or two supports - this is not decisive, except that the assembly technologies change slightly.
Two-wheeled devices are necessarily equipped with protection against touching the ground - simply because if you let go of it for a second, it will tilt. This incident will lead to breakdown. In addition, a belt for a lawn mower of this type will not be superfluous either. Since they are considered the most maneuverable, this will even be a plus. As a matter of fact, carrying it this way will be much easier than trying to roll it. That is, to make your life easier, you can easily use a lawn mower belt.
Units on four wheels cannot always be manufactured - the wheels must be of the same diameter. But two pairs of identical wheels are not always lying around in the garage. Nevertheless, this design is the most reliable because it provides high-quality support and also allows you to work with large areas of grass without experiencing unnecessary fatigue.
Helpful advice: the wheels should be large enough, since the ride will be on a rather difficult “road”. If you take an insufficient diameter, then mowing the grass will turn into hell.
Frame
If you don’t bother with design refinements, it will simply be a metal sheet of sufficient thickness. Actually, this will be the body of your device.
You need to prepare it for use before you start assembling, of course.
The main hole here will be in the middle - it should be left for the motor shaft, which will rotate the knife.
It is imperative to make a protective cover on the bottom - otherwise the lawn mower, made with such difficulty with your own hands, will not work for a long time simply because the cutting surfaces will touch the ground.
Between the wheels you need to prepare mounts for the control handles. However, you can attach them to the back surface, but this will not add stability during movement.
Removing descents
If a knife has not been sharpened for a long time, chips are likely to appear on it. You need to get rid of them by bringing the edge of the blade at a uniform angle along the entire length of the cutting section. Please note that there may be several edges on each side, in which case the lawn mower will have several cutting planes.
Lawn mower blades have a one-sided sharpening, the descent of which, as a rule, faces upward. To set the trigger at the desired angle, you should use an electric sharpener with a carborundum stone, or, if you don’t have one, use a fine file. It is very important to remove the metal evenly from both blades. Therefore, keep the same pressure and at least approximately count the number of passes of the sharpener.
Small deviations in the sharpening angle are not critical, however, the smoother the slopes are, the longer the life of the knife will be. When shaping the blade, it always moves towards the grain to avoid the formation of large burrs and flashes. You should not use a grinder for preliminary sharpening - overheating can deteriorate the quality of the metal. However, you can install a flap or disc disc on your angle grinder under sandpaper.
Components
The simplest device of this kind still consists of several parts.
First of all, this is the frame on which all other parts will be fixed. The engine is no less important - you will have to figure out its type yourself, since this is only your decision. In addition, you will need knives, a protective cover, wheels and control handles. However, all of the above can be found in your own garage, so spare parts for lawn mowers should not be a problem.
results
If you have a summer residence or a large plot of land next to your individual home or cottage, then for the convenience of collecting grass and weeds you should use a lawn mower. If you are thinking about choosing an electric lawn mower or How to Change a Trimmer Head... Trimmer Head: Types and Description One of the common devices created for cutting grass is the trimmer. It is very easy to operate and maintain. That's why he became popular among the population. Its significant advantage is its low weight. Even a child can handle such equipment. What it is? Trimmer…
Push-type lawn mowers are a thing of the past. To make work easier, the knives were driven by an electric motor. The design of an electric lawn mower remains simple, but some nuances have appeared.
{ ArticleToC: enabled=yes }
With electrical devices, it is easy to turn the area around a cottage or country house into a well-groomed area, emphasizing a certain level that the owner managed to achieve in landscape design. Using a scythe or even a trimmer cannot achieve such a result, since it will not be possible to cut the grass at the same height.
Making a pen
A sheet of paper on which your knife is depicted must be attached to a wooden block and traced with a pencil. You only need to trace the handle, because it is this that we will cut out and then attach to the blade. It is better to leave a space of a few centimeters around the handle shape. You should end up with two such mirror parts of the handle, which you will subsequently attach to the blade on both sides.
Once the shape of the future handle is obtained, use a bandsaw to cut out the shape of your handle.
Remember to leave at least 1 extra centimeter so you don't cut off too much material.
You need to make preliminary holes on the handle of the knife, as mentioned above, where you will insert your pins or rivets.
If your knife will have rivets, you must recess the hole to the desired depth. You can use a caliper to determine the size of the rivet head, which is the size of the hole to drill.
Before you move on to epoxidizing your blade and handle, shape and sand two identical handle pieces.
Do it yourself. HOMEMADE LAWN MOWER KNIFE. (DIY lawn mower knife)
Push the pins through the drilled holes to secure the wood and metal into place. Now you can fasten the knife with epoxy resin. Apply epoxy to one half of the handle and then join it to the blade and the other half of the handle. Once all the pieces are connected, take two clamps and clamp the knife handle together. Let the product stand for at least 5 minutes.
Heat treatment
Heat treating the blade is perhaps the most technically difficult part of the entire process. You can use a coal forge or a gas forge to forge metal.
The next hardening step is to heat the knife to a lower temperature (about 400 degrees Celsius). Thanks to this, the knife will be less fragile and will retain relative strength.
Now you will need a hardening bath. For steel, oil should be used. Different types of steel require different hardening methods - oil hardening, water hardening, air hardening.
You should completely submerge the blade in water until it cools completely. The second thing you need to harden metal is a magnet. It will help determine the hardening temperature, at which point the steel becomes non-magnetic.