Characteristics of LED strips
For ease of calculation, we have compiled comparative tables of several popular types of SMD tapes.
| Characteristics of LED strips | ||||
| Tape type | Diodes per meter | Power P, W/m | Voltage U, V | Brightness, Lm/m |
| SMD 3528 | 60 | 4,8 | 12 | 240 |
| 120 | 9,6 | 12 | 440 | |
| 240 | 19,2 | 12 | 880 | |
| SMD 5050 | 60 | 12 | 12 | 800 |
| 120 | 24 | 12 | 1600 | |
Be sure to pay attention to the country of manufacture. Brightness values may vary significantly among different manufacturers.
Let's take the popular SMD 3528 (neutral white) 60 pcs/m as an example.
| China | Taiwan | Europe | |
| Brightness, lm/m.p | 240 | 380-420 | Up to 500 |
| Power, W | 4,8 | 4,8 | 4,8 |
Chinese diodes are 1.5 times dimmer than Taiwanese ones and 2 times weaker than European products. Many will argue that they cost 4-5 times less than the “European” ones. You can’t argue with this, but the price of a normal driver for a strip will handle 10 meters of super-budget LEDs.
To make a table lamp, this is a completely decent option, but for lighting an apartment, buying a child from heaven is simply not profitable.
Choice of installation method: open or hidden
After determining the layout of cable lines, the method of laying cables should be adopted. There are two ways to lay lines - hidden, open.
The first method is common when the finishing of premises is carried out with suspended structures and false panels (plasterboard, MDF). There is no need to make grooves (grooves) in the walls followed by putty. Hidden electrical wiring installed in an apartment has a number of significant advantages:
- maintaining the general appearance and integrity of the interior;
- less stringent requirements for cable installation conditions;
- increased tolerances to permitted currents.
It is not uncommon to see the option of open wiring. Wires are often placed in special plastic boxes attached to the decorative surfaces of the room. The open method of laying cables has the following advantages:
- possibility of installation after or during finishing work;
- faster installation;
- the ability to modernize the network by installing additional cables or dismantling them.
Currently, if the arrangement of the electrical network is an integral part of the general renovation of the premises, specialists often use a hidden method of laying conductors.
Modern trends
Among modern techniques for lighting in an apartment, it is appropriate to use various lighting and decorative details as decoration or to enhance the design. These options will be the most interesting to consider.
Night lighting in the apartment
Rice. 7. Night lighting in the apartment
Night lighting is designed to create an atmosphere of comfort at a time when no active activities are taking place in the apartment. Such elements allow you to decorate dark corridors, the living room, create the effect of a starry sky in the bedroom, or highlight the contours of the ceiling pattern. In some cases, they act as a night light and can help household members orient themselves while moving to the bathroom or kitchen.
Motion sensors
Contactless switches have long occupied an important niche in lighting areas, retail facilities, and roadways, but now they are also used in apartments. For example, in the corridor or on the balcony, where the time spent is relatively short, and reaching the switch is not always convenient. The motion sensor turns on the light for a set period of time, after which the relay turns it off again.
Wireless lamps
Battery-powered lighting devices are installed in places where supplying a separate power supply line is impractical or in cases where the owner does not want to spoil the finishing work by gating walls and laying new wiring. Such lamps are not necessarily tied to any installation location; they can be fixed either permanently or moved from place to place.
LED strip installation
An LED strip along the perimeter of a stretch ceiling will look best in the baseboard due to the fact that diffused light will be reflected from its surface. This solution can be applied in almost any large room and even in the bathroom. By the way, when installing in a bathroom, do not forget about the safety rules and use tape with a protection class of IP68 - this will protect you and your equipment from short circuits.
A ceiling with lighting around the perimeter using a plinth is done in the following order:
When you come shopping, start from the fact that to illuminate a room measuring 3 m wide by 4 m long and with a ceiling height of 3 m, on average you will need 8000 Lm of luminous flux to illuminate the room in medium brightness mode. Divide this value as you wish and depending on how much light you want to add.
Luminous flux is measured in lumens and is indicated on the packaging. Select the power supply based on the power consumption of the tape, it is also indicated on the packaging. The power reserve of the power supply must be at least 20%.
The LED strip is connected to the power supply with a cable with a cross-section of 2 cores of 0.75 mm 2 each. It is not recommended to use a wire with a smaller diameter. Currents can reach 10 A.
Please note that the LED strip will not tolerate bending at an acute angle. It is based on a printed circuit board, so it is recommended to cut all corners at the indicated places and solder them or connect them using connectors.
First of all, install the baseboard, and then proceed to install the tape. Please note that when using a soldering iron, do not use acidic solder. Over time, they corrode the solder joints and the contact is broken; in the future, such an installation will cause the tape to flicker.
The tape is installed as a whole section no more than 5 meters in length. If we need to power a perimeter that is more than 5 meters, then the next 5 meters are connected to the network not in series with the previous tape, but again from the power supply.
Pull the cable straight from the place where the block is installed or from the place where you can cut into the core before connecting the tape, but in no case connect it to the end of the tape that comes before the previous one.
After the baseboard is installed, proceed to installing the tape. To do this, first solder all the joints, then remove the protective layer of the sticky side and carefully glue it into the baseboard. Be sure to make all connections with a soldering iron or use connectors.
Nuances of installing eaves lighting with a suspended ceiling
This combination is often used in decoration. To make the interior look beautiful, it is important to follow several rules.
You should not choose such lighting with a glossy film. The diodes and power supply will be reflected in the canvas, and the glare will hurt your eyes.
LED strip is used with a two-level ceiling if there is a matte canvas near the walls. There may be a smooth film in the center. The location of the diodes is calculated in such a way that the rays do not fall on the gloss.
Advice! If the suspended ceiling has not yet been installed, it is better to choose a special profile with a channel for the LED strip. The canvas is tucked into it and the LED strip is laid. To create contour lighting in tension structures, a contour profile or baguette for floating ceilings is used. This reduces overall installation time because fillets are not required.
Making lighting using lamps
If the ceiling is made of gypsum board, then illumination with lamps is carried out according to the following scheme:
Frame for niches made of gypsum board
Running an electrical cable to connect lamps
Installation and connection of fluorescent lamps
How to fix the baseboard?
If you are attaching to a soft material - wood, MDF or drywall - you can fix it with self-tapping screws. This fastening is secure, but will be noticeable. Even if you cover the caps of the screws with color-matched plugs, you will still be able to see them.
Therefore, you need to use more elegant fasteners.
Option 1 - use “Dragon” glue. It provides good contact and a fairly elastic seam. Appearance: transparent gel. It has a noticeable drawback - it takes a very long time to dry. "Dragon" is ideal for polyurethane and foam.
Option 2 - acrylic adhesive for polyurethane and foam. It looks like a white paste, after drying it resembles putty. It dries quite quickly, the gluing area is dry and hard.
Option 3 - Liquid Nails or Installation glue - is quite popular among builders, it is universal and suitable for most types of materials. In appearance and properties it resembles the previous one.
If you have experience using other adhesive materials, please share in the comments!
The glue must be applied either in dots or in a thin strip over the entire area. This way you will avoid sagging of the baseboard in certain areas.
Mount to the ceiling or wall?
Ceiling lighting with LED strip can be done in different ways:
Wall mounting is a more common option. The plinth is attached to the wall with one of the mounting planes and the light strip illuminates the ceiling.
Mounting to the ceiling gives a slightly different effect. The light comes out under the baseboard and is directed down the wall.
Lighting scenarios
Lamps are selected and placed based on how the room will be used. There are no universal solutions. The scenarios depend on the functional areas, lifestyle and requirements of the apartment owners.
- In the living room they usually relax, watch TV, and read. As a rule, bright general light is not needed here: it invigorates, not relaxes. But still, the lighting should be solemn: holidays are celebrated in this room and guests are received. Therefore, as a rule, it is decorated more elegantly than other rooms. Soft general lighting will be provided by built-in or pendant lamps. Decorative items are also needed: they will decorate the interior and create the necessary mood.
- In the bedroom they relax, read, watch TV, and change clothes. This is an intimate part of the apartment; comfort and harmony in the interior are important here. You can place dim lamps near the bed, spots or spotlights near the closet, and illuminate the mirrors. Bright ambient light helps you wake up in the morning, so it's worth adding that too. Decorative lighting - optional.
- The nursery should have a lot of light. General lighting is required, and working lighting is required in areas for relaxation, study and play. Decorative - optional: garlands and night lights will make the room more comfortable.
- The kitchen illuminates the work surface and dining area. General light is not necessary, especially if the kitchen is small: built-in lamps along the furniture, lighting above the countertop and a pendant or wall lamp above the table are sufficient.
- In the hallway, the lighting should be bright: there are rarely windows here, so you need to compensate for the lack of sunlight. Built-in lamps are chosen as general lighting. They can be supplemented with a chandelier in the center of the ceiling if the room is large. Working lighting will also be needed: sconces or lamps near the mirror, cabinet lighting.
- In the bathroom you need general lighting and directional lighting (near the mirror). Sometimes built-in shelving is illuminated for beauty.
- The toilet only needs general lighting. Directional is unlikely to be useful, decorative is optional.
Thoughtful scenarios help determine the number and location of lamps. They are marked on the plan of the future interior immediately after the furniture: this way each light bulb will find its place.
Let's look at lighting scenarios using the example of a studio apartment. There is one room here, but it is divided into zones: bedroom, living room, kitchen, dining room, office. The apartment also has a dressing room, hallway and bathroom.
The role of general lighting was played by a track structure on the ceiling in the center of the room. The lamps can be directed where more light is needed - for example, at the workplace.
Track lighting around the perimeter and pendant lamp behind the sofa / Project author: Tatyana Vasilyeva
Each zone has directional lighting: in the kitchen there is lighting above the countertop, in the bedroom there is a sconce, there are pendant lights above the dining table and sofa, and a floor lamp at the desk. They are included as needed.
Lighting above the kitchen countertop, lamp above the dining table / Project author: Tatyana Vasilyeva
Decorative lamps were provided near the bed. They provide soft, dim lighting. Convenient if you want to watch TV before bed.
We decided to place sconces and decorative lighting in the bedroom area / Project author: Tatyana Vasilyeva
Only general lighting was left in the hallway and dressing room. These are small rooms where you don't need too much light. In the bathroom we decided to assemble a multi-level ceiling and install lamps in it. A mirror with built-in lighting was provided.
Three-level ceiling in the bathroom / Project author: Tatyana Vasilyeva
It turns out that for every action of the apartment owners there is a lighting scenario: you can read in bed, have dinner in the cozy light of a lamp, watch TV comfortably, apply makeup or shave in front of the mirror in the bathroom. The work areas are sufficiently lit to make them comfortable to use. The light can be adjusted to suit your mood: bright for entertaining guests, dim for a relaxing environment.
Installation of electrical wiring in the apartment
Do-it-yourself electrical wiring in an apartment, step by step, is a matter that requires increased attention to the work being performed, strict adherence to safety standards and installation rules.
The slightest mistakes can cause a short circuit. There are a number of certain rules, following which you can make high-quality electrical wiring.
Carrying out electrical work is not particularly difficult for those who know how to handle the tool.
Installation can be done in either of two ways. Hidden installation methods include embedding wiring into walls, ceilings and voids, under floor coverings, behind plasterboard sheets.
The open installation method includes laying cables in special boxes, cable ducts, using staples and clips. Both of these methods have their advantages. To perform installation, first of all, it is necessary to move all furniture and household appliances away from the walls and, if a major renovation is being carried out, remove all construction debris.
- Installation of “rough” electrics is carried out in several stages:
- drilling holes for socket boxes and distribution boxes;
- wall gating;
- preparing the ceiling for laying cables;
- installation of distribution board;
- cable laying;
- switching of distribution boxes;
- electrical panel assembly;
- system check;
- installation of temporary lamps and switches necessary for the repair process.
Let's look briefly at each of these stages.
Methods for laying electrical wires and cables
- There are 2 ways to install electrical wiring in apartments:
- open;
- hidden.
- The latter in turn can be divided into:
- ceiling gasket;
- laying on walls;
- and flooring.
Hidden way
This technology is the most dusty and dirty, since you will have to trench the walls and ceiling or tear off the floor covering. Therefore, it is best to perform it during a major overhaul.
If the electrical supply project plans for wiring along the walls, then we mark them with places for wiring, pick up a hammer drill or grinder and cut out grooves of a certain width and depth. We select the depth on the basis that after laying the wiring or cable, the layer of plaster will be no more than 10 mm, the width is unlimited.
We cut out places for sockets and distribution boxes using a special crown. We remember about load-bearing walls and make grooves in them that are not too deep. In apartments of panel houses, the interfloor ceilings have internal voids in which wiring can be laid.
Today, monolithic structures with brick interior floors are more popular; in such apartments, grooves are made in all walls, the main thing is not to catch the load-bearing monolithic beams.
The most economical option for hidden installation is installation under the floor covering. The main thing is the presence of corrugations for each wire. This is done for convenience in case of repair or replacement of wires and for additional insulation.
After the grooves are equipped, they begin to install the lighting distribution panel and lay the cable. The shield itself can be mounted or embedded in the wall. In new houses there is a special niche for it, and in old houses it is fixed to the wall using self-tapping screws.
Inside the panel we install machines from which VVG-3*2.5 wires will go to the sockets and the main line. We lay VVG-3*1.5 from distribution boxes to lighting fixtures. For stationary high-power devices we make separate lines from VVG-3*2.5 cable. At the places where the connection points are installed, we make an outlet of 15-20 cm.
Now in the junction boxes we connect the wires into a single network. The highest quality connection will be the use of P&S. To avoid mixing up the wires during connection, you can hang tags with specific markings on them.
After that, using a tester, we check the entire network for damage and errors. If everything is fine, then we wall it up, put the switches and sockets in place.
Outdoor installation
For rooms where it is prohibited or impossible to lay wires hidden, open installation is used (external wiring in the apartment). For these purposes, boxes, cable channels or special clips are used. The installation is quite simple and is carried out only along the walls and ceiling.
The first thing we do is mark the laying location and drill holes for fastening in increments of 40-50 cm; if the space for the wire is less than 0.5 m, then we make increments of 15 cm for two fastening points.
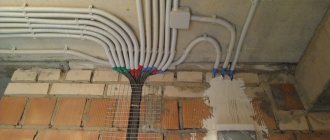
After this, we attach boxes, cable ducts or clips to the wall or ceiling. We install external junction boxes at the wiring points, and carry out the wire connections, wiring and installation of connection points in the same way as in the hidden installation method.
The advantage of open mounting is easy access to all wiring, but the disadvantage is that it is not very aesthetically pleasing.
Ceiling wiring installation
Typically, cables from the apartment electrical distribution board are laid along the ceiling (floor slab).
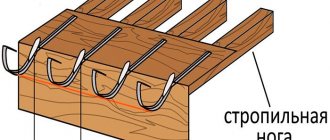
Holes are drilled in the ceiling, then when laying the cable, a cable fastener is inserted into this hole. I will dwell on this in detail, I will only say that there are many installation options (for example, a dowel-clamp, dowels with a tie).
Tools required for electrical installation
- Before you begin installing electrical wiring in the apartment, prepare the following tools:
- A wall chaser (or, in extreme cases, a grinder) for cutting furrows, a hammer drill.
- Screwdriver Set.
- Pliers, wire cutters.
- Building level.
- Phase indicator.
- Drills, a crown for a hammer drill for drilling out sockets for socket boxes.
- Knife and hacksaw.
If you don’t have a professional tool, you can always rent one.
Which wire to use for wiring in an apartment
Currently, there is no question about what kind of wire is needed for wiring in the apartment. For the installation of home electrical wiring, wires and cables are used exclusively with copper conductors. Wires and cables with aluminum conductors cannot be used for internal electrical wiring.
- Give preference to copper wires, as they have:
- increased ductility (less likely to break during installation);
- corrosion resistance (oxidizes more slowly);
- long service life relative to aluminum;
- can withstand greater loads with a smaller cross-section.
Wires and cables can be single-core or multi-core. Multicore wires and cables have two or more cores reliably insulated from each other in a common sheath.
An example of a stranded wire is a wire of the PRTO brand (a wire with a copper core with rubber insulation in a braid of cotton yarn impregnated with an anti-rot composition). The cores of single-core and multi-core wires and cables can be made single-wire and multi-wire.
Cables and wires differ from each other in the type of sheath and names. The sheath of wires and cables serves to protect the insulation of the cores from exposure to light, moisture, various chemicals and prevent them from mechanical damage. The cable may include armor, and the sheath allows it to be installed in more adverse environmental conditions.
Wires can only be laid in a hidden way; if laid openly, only in pipes and ducts. Cables can be laid openly.
The most popular cable for use in home electrical wiring is VVGng; NYM cable and PUNP wire are less commonly used.
To connect to the floor panel, it is best to use an NYM cable. The same cable is used to connect the floor panel with the apartment or room panels (provided that they exist). Usually such shields are organized in private cottages.
It can also be used for individual connection of powerful consumers. This cable can be used to do all the power wiring in an apartment or house, but since it costs more than the VVGng cable and PUNP wire, it is used less often for these purposes.
VVG is an unarmored protected cable with copper conductors, polyvinyl chloride insulation, in a polyvinyl chloride sheath. The cable can be used in dry and damp areas.
The VVG cable is not designed for stretching. The insulated conductors of the VVG cable are twisted and have a distinctive color. The inner shell does not contain filling in the inter-vein space.
Cable VVGng
The designation “ng” in the name of the cable (VVGng) means that it does not propagate combustion when laid in bundles (a composition based on fire-resistant plastic is used). If VVG cable is used instead of VVGng cable, then if one of the cables catches fire, the flame will spread to other cables instead of localizing the fire.
The VVGng cable has a wide variety of shapes. It is most convenient to use a VVGng flat cable. In addition, it can also be round, square, sector, and even triangular.
NUM cable (NYM) – produced according to the German standard DIN 57250. The cable can be used indoors for hidden and open installation. NYM cable can be used outdoors, only out of direct sunlight. NYM cable has reduced flammability and gas and smoke emission, which is especially important for residential premises.
NYM cable
The NYM cable consists of copper cores, an intermediate sheath of chalk-filled rubber and a sheath of flame retardant polyvinyl chloride insulation. The use of an intermediate sheath in the cable design makes it easy and convenient to cut the cable during installation, increases its fire hazard and increases flexibility.
PUNP – installation flat wire. This is the cheapest wire of all cable and wire products used for installing electrical wiring in the home. PUNP wire is produced with two or three single-wire copper cores and polyvinyl chloride insulation in a PVC sheath. The veins can be painted in different colors.
Wire PUNP
PUNP wire is only available flat. These cable and wire products are used for both power and lighting networks. In the second case, wires of smaller cross-sections are used.
Much less often, when wiring home electrical systems, rubber-insulated wires of the PRN, PRI, and PRTO brands are used. The PRTO wire is intended for laying in fireproof pipes, PRI - can be used for laying in dry and damp rooms, PRN (protected wire) - in the open air, PRD, PRVD (two-core twisted wire) - only in lighting networks of dry rooms.
For open wiring, it is convenient to use a flat wire with copper conductors and polyvinyl chloride insulation with a dividing base of the PPV brand, as well as a wire with polyethylene insulation PPP. There is a flat wire without a dividing base - PPVS, but it is not very convenient to use.
Previously used wires with aluminum conductors (APR, APV, APRTO, APPV) are now not used in the construction and modernization of home electrical wiring.
Wire with copper core and polyvinyl chloride insulation PV. PV wires can be single-wire or multi-wire. Wires are available with different insulation colors. In household electrical wiring, single-core wire PV1 in yellow-green coloring is used for the potential equalization system (PSUP).
Wire PV1
When choosing wires and cables, it is necessary to comply with the requirements of the PUE for insulation painting.
The insulation of the neutral working conductor should be blue, the neutral protective conductor should be yellow-green. The color of the insulation of phase conductors must be different from the color of neutral conductors. There are many options here - brown, red, grey, white, black, etc.
It is also very convenient to use a different color of phase conductors for each section of electrical wiring, as well as different colors of core insulation for power and lighting wiring.
If you choose and then install electrical wiring with a wire or cable without complying with the requirements for the color of the cores, then in the future this will lead to significant difficulties in servicing and repairing electrical equipment in the apartment. In addition, the installation process itself can be very complicated, especially when using a large number of switches and sockets.
For different groups of household electrical appliances, wires with different cross-sections should be used.
- It would be best to divide the power cables into groups and connect them to separate machines:
- Lighting - wire cross-section from 1.5 mm (automatic - 16 A).
- Sockets - cross-section must be at least 2.5 mm (circuit breaker - 20 A).
- Powerful electrical appliances, such as electric stoves and hobs - at least 4 mm (25 A).
Installation of residential electrical panel
Before laying cables, it is advisable to mount the electrical panel into the wall. The size of the switchboard is selected according to the number of circuit breakers, RCDs, and differential circuit breakers that will be installed in it.
The boards are produced in the following main sizes: 4, 8, 12, 18, 24, 36, 48, 60, 72 modules (1 module = 1 single-pole circuit breaker). In an apartment, panels of 12, 24, or 36 modules are usually used.
In my practice of electrical installation of apartments, in most cases I use electrical panels with 24 or 36 modules (24 modules for a 1-room apartment, 36 modules for a 2 or 3 room apartment).
One shield may not be enough if you plan to use equipment for telecommunication networks (router, media converter). In this case, it is rational to place these components in an additional electrical panel, which is installed next to the main (power) panel.
Modern electrical panels are hidden in the wall and do not take up much space.
The advantages of installing an additional electrical panel are that it accommodates the network equipment that is necessary for the functioning of television and the Internet. Thus, a router hung in the hallway on a nail is a thing of the past. In return come functional and ergonomic solutions.
Installation of socket boxes and distribution boxes
After marking, the locations of future sockets and switches became visible. In most cases, nowadays, sockets are installed closer to the floor at a height of about 20-40 cm from the floor, switches - at a height of 70-90 cm from the floor.
This rule is not strictly mandatory; changes are possible upon request. For example, it is more convenient for tall people to use switches located higher; for short people, on the contrary, it is better if the switch is placed lower.
Sockets and switches can be assembled into blocks of up to 5 pieces, and sometimes up to 6 in one line. Moreover, both vertical and horizontal installation is possible. All these points should already be taken into account when marking.
Now all that remains is to drill holes in the wall for the socket boxes. The standard European socket box has a diameter of 68 mm. When folding several socket boxes in a row, the distance between their centers should be exactly 71 mm. The depth of the socket boxes is 45 mm or 60 mm.
Deeper ones are used, for example, for installing a temperature controller for a heated floor or for switching electrical wires if necessary.
After this, holes are drilled for the junction boxes. Typically, distribution boxes (they are also called doses) are mounted under the ceiling at a distance of approximately 15-30 cm from the ceiling. The following rule must be observed: doses must be on the same vertical axis with sockets and/or switches located below.
Not everyone likes having distribution boxes visible on the wall. Installation of distribution boxes under the ceiling is allowed, provided the wires are connected by welding or crimping.
Wall chipping
Grooving is the process of cutting grooves (deepening, furrows) in concrete, brick or plaster layer for the subsequent installation of communications into it (in electrical communications are electrical cables and wires, in plumbing – pipes).
Before cutting, it is necessary to indicate the width and depth of the groove.
- These parameters are determined based on:
- number of cables laid together;
- cable sections;
- the location of the cables in the groove relative to each other.
Regarding the last point, it is worth clarifying: cables in a groove can be laid either flat or deep into the groove. In one case the groove is made deeper, in the other - wider. Here each electrician decides for himself.
You should not make the groove too wide (with a margin) - during installation the wire will constantly fall out and will have to be secured in the groove with special clips or “grabbed” with plaster. It is ideal to make a groove 4 mm wide for a wire with a cross-section of 1.5 mm - the cable fits in there with a little tension and holds without problems.
I strongly recommend making grooves using a wall chaser with a connected industrial vacuum cleaner, and not using an angle grinder for this. Since fine dust after such gating will settle for quite a long time, which can stall all the work.
Professional electricians usually have all these tools (wall chaser and industrial vacuum cleaner) in stock. If you install them yourself, you can rent them.
Wiring
- Wires can be routed in 3 ways:
- along the ceiling;
- by gender;
- along the walls.
- Wiring electrical wiring to the ceiling is, in my opinion, the best option:
- there is no risk of breaking the wire during repairs;
- There is always a way to get to the wiring.
If necessary, you can always remove the suspended ceiling, make changes to the electrical wiring, and then install the ceiling in place. When laying on the floor, you will have to chisel the screed, which is fraught with high costs.
Connecting wires in a junction box
- The main options for connecting conductors in junction boxes:
- twist;
- soldering;
- welding;
- crimping;
- PPE caps;
- Wago type connectors.
Please note that only connections made by welding and crimping (as the most reliable) can be bricked up according to the PUE.
Sources of light
Among lighting sources, there are two large groups - artificial light devices (lamps, LED strips, matrices, etc.), as well as natural light. The first source is not limited in time, but is costly from a financial point of view. The second is limited by the time of day, weather conditions and other factors, but allows you to save money. However, both categories require proper combination and placement relative to each other.
Natural light
Rice. 5. Natural lighting in the apartment
Despite the positive aspects of using natural light in an apartment, there is also a disturbing influence, which is determined by the position of the window relative to the cardinal points:
- The south window is considered the most powerful source, but at lunchtime the light can reach excessive levels, which will make staying in the room uncomfortable. Therefore, to regulate the intensity, blinds or roller blinds are installed on the windows.
- The northern one provides the minimum amount of illumination compared to the others, so the main thing is not to interfere with such windows; the sun almost never acts here in full force.
- Eastern - in intensity it is not much inferior to the southern ones, the difference exists only in the time of activity. Therefore, all measures here are identical.
- Western - can produce powerful lighting in the evening at sunset, so it is also advisable to close the window with a curtain.
Artificial lighting
In relation to natural light sources, artificial ones should be located in such a way that at dusk their flows do not overlap each other.
Rice. 6. Position of artificial lighting devices in relation to natural lighting
So, in the immediate vicinity of the window there is no point in installing a chandelier or a whole row of spotlights. Otherwise, the light that you could use for free will be completely extinguished by the main sources. If necessary, spot functional lighting can be installed near the window for a specific purpose.
Where to start installing electrical wiring in an apartment
Work on installing electrical wiring in an apartment or other residential premises should always begin the same way - with drawing up an electrical wiring plan. And that's why. Let's say you made a renovation without really thinking about the end result. They did it as they wanted.
We rearranged the furniture and arranged the household electronics. So what did we get? Catastrophe! All sockets were in “cold reserve”: one was blocked by a closet, another by a sofa, a third by a chest of drawers, and a fourth by a bedside table. Even to connect a TV and favorite stereo system, as per the law of meanness, there were no sockets within a radius of 3-4 meters.
And here begins a very fun and exciting game called “Scatter extension cords and pilots throughout the apartment.” The question arises: why did you make new electrical wiring so that you could then walk around and trip over extension cords? Imagine how much money and nerves can be wasted.
Halogen lamps connected via transformer
To save and operate electricity safely, lighting circuits are used that use not 220 V, but much lower rated voltages. An example is halogen lamps of 6, 12 and 24 V. Low-voltage halogen lamps shine no brighter than conventional lamps, and consume an order of magnitude less energy. In addition, low voltage guarantees human safety.
Step-down transformer for halogen lamps: 2 wires are designed for a mains voltage of 220 V, another 2 for an output voltage of 12 V
Typically, such lamps are installed in bathrooms for safety reasons. The only “but” when using halogen lamps is that they require the installation of a step-down transformer.
Halogen lamps of this voltage are installed in built-in lamps in suspended ceilings. Modern electronic transformers are small in size, which makes it easy to mount them directly on the ceiling frame. You need to choose a transformer for a lamp in this way.
Transformer connection diagram for halogen lamps
First, a lighting diagram is drawn, which indicates the number of lamps and their power, then the last value is summed up and 10–15% is added to the resulting number (just in case).
Installation of halogen lamps with a transformer in a suspended ceiling
For example, we can suggest the following scheme: the room is illuminated by 6 lamps of 12 V each. We multiply 12 x 16 = 196 W, round up to 200 W - this will be an indicator of the power of the required transformer. When installing and operating such a device, you must remember that during operation it can become very hot (up to +90 °C). You should not purchase a transformer with too much power. It's best when it's running at full load. For example, if there is a 300 W transformer, and you plan to connect light bulbs with a total power of 250 W to it, then it is better to add another pair of 24 V.
Installation of halogen lamps and transformer simultaneously with the ceiling
The ceiling behind which such a device is located must be equipped with special hatches so that in case of breakdown or adjustment it can be easily reached. If there are several lighting zones, then instead of one powerful transformer it is better to purchase several weaker ones - it will be cheaper and easier to install. For a lighting group powered by transformers, it is better to allocate a separate circuit breaker that does not allow overload. It is very dangerous for such devices.
Note. For low-voltage halogen lamps, you should not install a dimmer. It begins to work incorrectly and its service life is reduced.
These articles may also be of interest to you:
- Electrical connection diagrams
- Wire routing
- Lightning protection in a private home
- Replacing the siphon and sink drain
PWM controller and remote control
Photo of the regulator
The brain of the system can regulate the brightness and temperature of the tape. Controlled using a remote control or Wi-Fi bridge. Power supply within 12-24 volts, maximum input current (or total output) 12 amperes. There are no complaints about the regulator, it came in a neat box wrapped in bubble polyethylene. The connection is very simple, you need to tighten 5 terminals: - Power supply +24V - Power supply 0V - +24 output to the tape - Cold light output - Warm light output
Photo of the remote control
The remote control came without batteries, but was packaged in the same way, no complaints either. The overall impression of MiLight devices is absolutely positive, everything is stylish, simple and of high quality.